|
Splicing a loop
by Jack Cook
It seems to make most
folks pretty nervous to cut and splice a fly line or to put neat
little loops at the ends of one. Most folks end up using braided loops
or just use a line the way it comes rather than changing it. The point
of this article is to show you how easy it is to make a loop in the
end of a fly line. All it take is patience and practice. I will admit
that the first few I did were tough. Like everything will patience and
practice I am pretty good at it now. The instructions show how to do a
loop. To splice lines together use the same techniques but skip the
loop. Just pull the two cores together until the covers meet and you
are done.

First we need to get
the cover off the core. This can be done in a few different ways
depending on the line construction. Sometimes you dip it in acetone
and off it comes.
I usually start by tying an overhand knot in a piece
of 25# mono and tightening it around the line. Once tight just pull it
off with a pair of pliers and the core comes with. This will take some
testing on your part to determine the best way to do your line but
once you have it dialed in you can repeat it over and over.
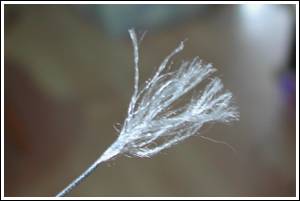
We need about three
inches of core to use during the splice/loop. If you are weighing a
line out then be sure to leave about .5 grams extra as removing the
cover from 3" of line causes the head to lose some weight. Take
the exposed 3" of core and using a bodkin fray the last inch nice
and loose. Pull about half of the frayed end and trim it off. This
gives us a tapered end which will be easier to get through the opening
we are going to make in the line.
The next thing I do
is to take a bodkin and stick it into the core where the cover ends
and push it in a little. You may not be able to get it very far in but
that is OK. All we are doing here is stretching the entry point a bit
to make it easier to get the core started inside the cover.
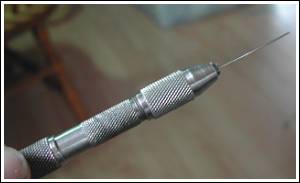
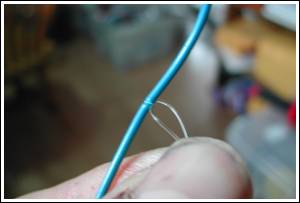
To get inside the
core and cover I use a crewel needle. This is a needle which is a
little beefier than a sewing needle and does not have a sharp point. A
sharp point makes it hard to keep it inside. I put the needle into a
pin vise. This makes it very easy to hold on to and gives excellent
control.
Remove the bodkin and
insert the needle in the hole. Spin the needle like a drill and slide
it into the core/cover. Keep the tail of the line straight as you do
this so the needle does not pop out. You will be surprised how easy
this will be after the first few times. Patience and Practice. Get the
needle at least .5" into the core, the more the better. Remove
the pin vise.
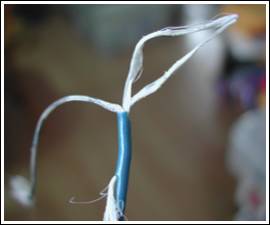
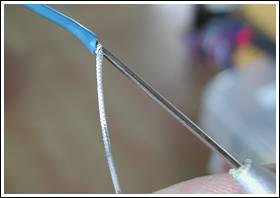
Take a foot long
piece of DENTAL TAPE, this stuff is thin and strong, and put it into
the eye of the needle and pull it through so you leave a loop of it at
the end of the cover. The tape will be used to pull the core inside.
Slide the tapered end of the core into the loop of tape so that the
middle of the tapered part is in the center of the eye. Pull
everything snug. At this point the centered of the tapered core is
snug against the opening in the core/cover where the tape goes
through.
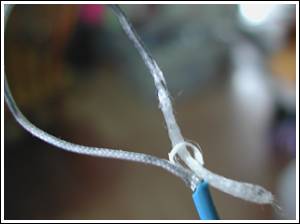
Pull a little tension
on the tape. The core may resist going easily into the hole. If it
does do not fight it. Pull on the loop of core a bit, roll the cover
in you fingers where it is trying to go in. We are just plying and
stretching the core to loosen things up. Put a little more tension on
the tape and try pulling it in again. Eventually it will do. Patience
and Practice.

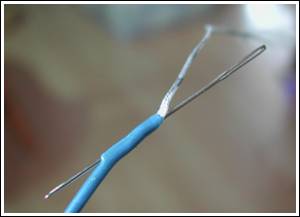
Sorry about the
quality of this photo. Here you see the tape is pulled through and the
tapered part of the core is sticking through. Take your flat nose
pliers and pull a bit to expose a bit of the whole core. Now for glue.
No stiff glue like Super or epoxy. Stiff joints saw through the line.
Aquaseal works great but it a pain to work with. If you do use it be
sure to thin with Toluene. I am using Tear Mender Adhesive. Water
based, 20 minute dry time, nice a bendy when dry, PERFECT!
Be sure and
SATURATE the core with glue before you pull it in. Cores have a
tendency to resist moisture so take some time and be sure to get it
all wet with glue. Then pull it in.
Once in massage the joint with
finger and pull gently of the loop to help seat the joint and the
glue. You can do this. BTW, joints made with cores do not hinge. Watch
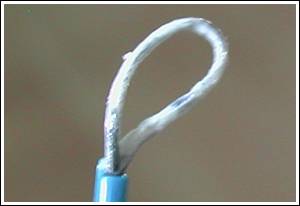
them for wear. A very tidy loop can be made by using a piece of
running line and pulling the two core into the end of the line. This
loop will be a bit stiffer and may wear better.
Text
and photos by Jack
Cook 2006 ©
Steelhead Anglers / The
Irish Angler
|